

Hey there! I'm a supplier of bulk roofing nails, and I know how important it is to keep these nails clean. Clean roofing nails not only look better but also perform better and last longer. In this blog, I'll share some tips on how to clean bulk roofing nails effectively.
Why Clean Bulk Roofing Nails?
First off, let's talk about why cleaning is so crucial. Roofing nails are often exposed to the elements, which can lead to rust and corrosion. Rust not only weakens the nails but can also stain the roofing materials. If you're a contractor or a DIY enthusiast, using clean nails ensures a better installation and a longer - lasting roof. As a bulk roofing nail supplier, I want my customers to get the most out of their purchase, and cleaning the nails is a big part of that.
Tools and Materials You'll Need
Before you start cleaning, gather the necessary tools and materials. You'll need:
- A large container: This could be a plastic bucket or a metal tub. Make sure it's big enough to hold all the nails you want to clean.
- Cleaning solution: You can use a commercial rust remover, or a homemade solution of vinegar and water. Vinegar is a natural acid that can dissolve rust. A ratio of 1 part vinegar to 3 parts water usually works well.
- A wire brush: This will help you scrub off any stubborn dirt or rust.
- Gloves: To protect your hands from the cleaning solution and any sharp edges on the nails.
- A sieve or strainer: To separate the nails from the cleaning solution after soaking.
Step - by - Step Cleaning Process
1. Sort the Nails
Start by sorting through the bulk roofing nails. Remove any nails that are bent, broken, or severely rusted. These nails won't be suitable for use and can be discarded. This step also helps you focus on cleaning the nails that are still in good condition.
2. Soak the Nails
Once you've sorted the nails, place them in the large container. Pour the cleaning solution over the nails until they are completely submerged. If you're using vinegar and water, let the nails soak for at least 24 hours. For commercial rust removers, follow the instructions on the label regarding soaking time.
During the soaking process, the acid in the solution will start to break down the rust and loosen any dirt on the nails. You might notice some bubbles forming, which is a sign that the chemical reaction is taking place.
3. Scrub the Nails
After soaking, put on your gloves and use the wire brush to scrub the nails. Gently brush each nail to remove any remaining rust or dirt. Pay special attention to the areas where the rust is most concentrated, such as the heads and the shanks of the nails.
If you have a large quantity of nails, you can do this in batches. It might take a bit of time and effort, but it's worth it to get the nails clean.
4. Rinse the Nails
Once you've scrubbed all the nails, use the sieve or strainer to drain the cleaning solution. Then, rinse the nails thoroughly with clean water. This will remove any residue from the cleaning solution and prevent it from causing further damage to the nails.
5. Dry the Nails
After rinsing, spread the nails out on a clean, dry surface. You can use a towel or a piece of cardboard. Let the nails air - dry completely. Make sure they are completely dry before storing them, as any moisture left on the nails can lead to new rust formation.
Preventing Future Rust
Cleaning the nails is one thing, but preventing future rust is equally important. Here are some tips:
- Store the nails in a dry place: Moisture is the enemy of roofing nails. Keep them in a dry storage area, away from humidity. You can use sealed containers or plastic bags to keep the moisture out.
- Apply a protective coating: After cleaning and drying the nails, you can apply a thin layer of oil or a rust - preventive spray. This will create a barrier between the nails and the air, reducing the risk of rust.
Our Product Range
As a bulk roofing nail supplier, I offer a wide range of high - quality roofing nails. Check out our Diamond Point Ring Shank Coil Nails, which are known for their excellent holding power. The diamond point design makes it easier to drive the nails into the roofing material, and the ring shank provides extra grip.
We also have Ring Shank Jumbo Coil Nails. These nails are larger in size and are perfect for heavy - duty roofing projects. They can withstand more pressure and provide a more secure installation.

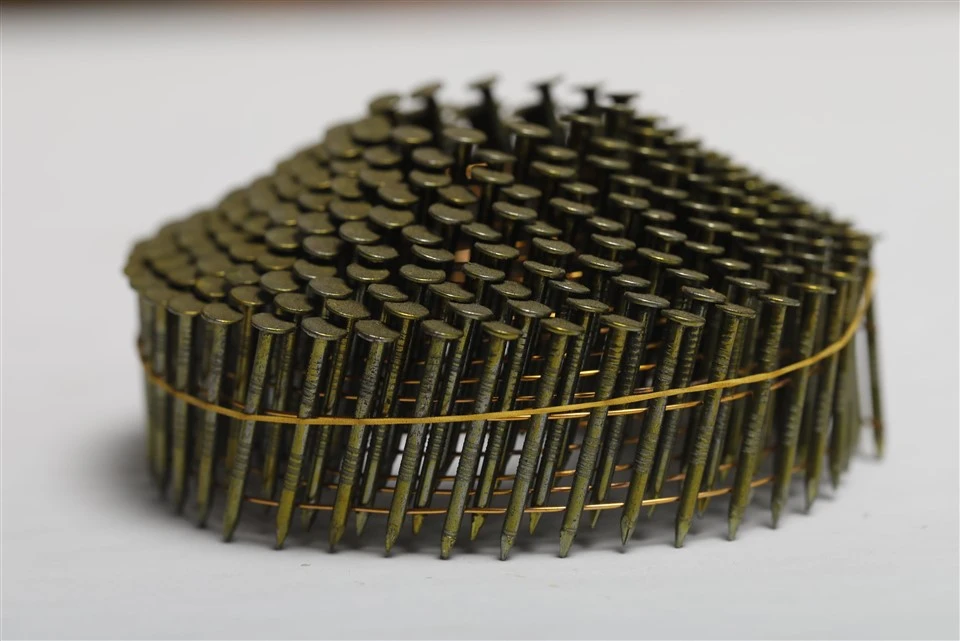
Another great option is our 2.1x32mm/2.1x38mm Conical (dome) Ring Shank Wire Coil Nails. The conical shape of these nails makes them ideal for certain types of roofing materials, and the ring shank ensures a tight fit.
Contact Us for Purchase
If you're interested in purchasing our bulk roofing nails, don't hesitate to reach out. Whether you're a professional contractor or a DIYer, we have the right nails for your project. Our team is ready to assist you with any questions you might have and help you choose the best nails for your needs.
References
- "Roofing Nails: A Comprehensive Guide" by Roofing Magazine
- "Preventing Rust in Metal Fasteners" by Hardware Journal